A job is a piece of work to be done — "get a quote", "order the part", "replace the plug". When a defect records a problem, jobs record the work that fixes it. Keeping the two separate is what gives you a full, honest history against every asset. This article covers turning a defect into one or more jobs and completing them.
Why not just fix it inside the defect?
It's tempting to manage the whole repair on the defect itself, but if you pass a defect around between people you lose all the hidden work that went into it. Instead:
- The defect stays as the record of the problem.
- Each piece of work becomes its own job.
A year on, you can open an asset and see how many defects it raised and how many jobs went into keeping it going — the evidence you need to take a worn-out asset to council for replacement.
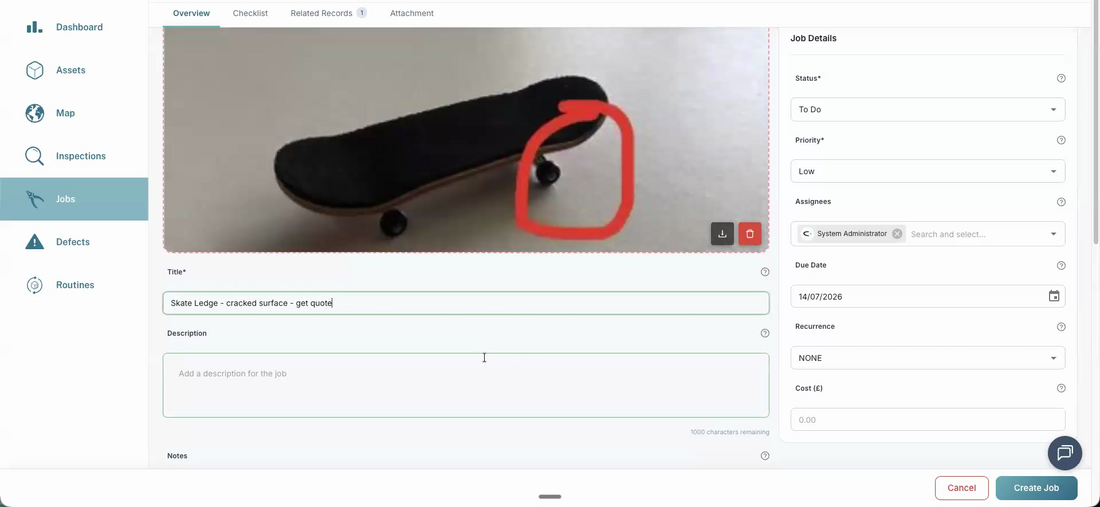
Create a job from a defect
- Open the defect in the web app.
- Use Create Job (the leaves/shears icon on the record header).
- The title pre-fills from the defect (for example "Skate Ledge – cracked surface – "), so add what this job is: "get quote".
- Fill in the Job Details panel:
- Status — To Do, In Progress, Awaiting, Done or Cancelled (jobs don't pass or fail — they're either done or not).
- Priority — Low, Medium, High or Urgent.
- Assignees — the person (or people) who'll do it.
- Due Date, and a Recurrence if it repeats.
- Cost (£) — optional, to track spend against the asset.
- Click Create Job.
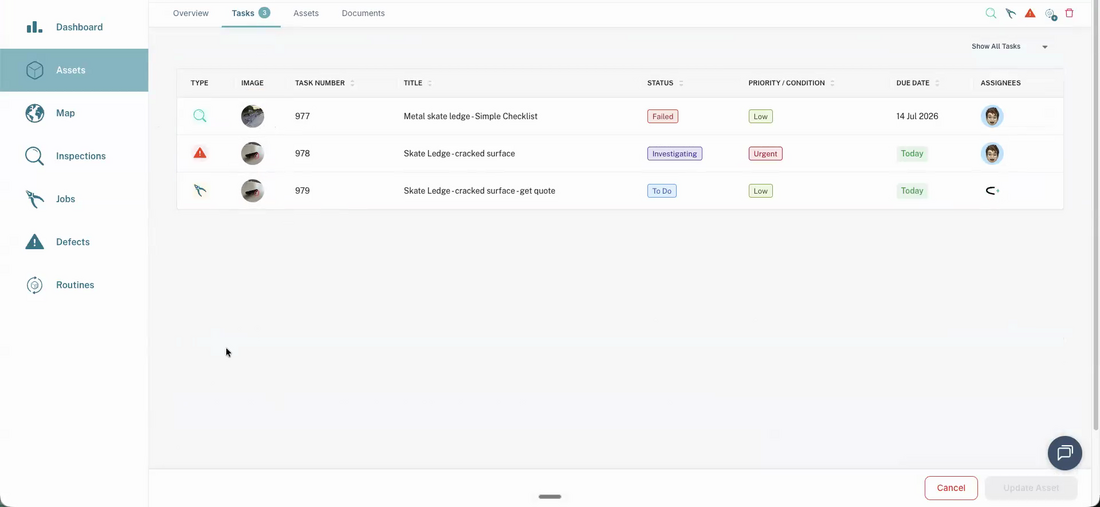
One defect, several jobs
A single fault often takes more than one job, and more than one person: investigate → get a quote → order the part → install it. Create a job for each step and assign it to whoever's doing that bit. The person who completes a job can replace the job's photo on the mobile app with a picture of the finished work as proof.
It all rolls up to the asset
Open any asset and go to its Tasks tab to see everything connected to it in one place — the inspection that failed, the defect it raised, and the jobs fixing it, each with its own status. This is the operational history that builds over time: the routine passes are just noise, but the defects and the jobs are the story of how you've looked after that asset.
Once all the jobs are done, go back to the defect and mark it Fixed or Closed.
- Name jobs so field staff know what to do — the title carries onto their task list, so "get quote" or "replace surface" beats a bare asset name.
- Assign to more than one person if you're not sure who'll do it — with hide completed and sort by nearest on the mobile app, it drops off everyone's list once someone completes it.
- Use the cost field if you want a running total of what an asset has cost you to maintain.
Common Questions
Yes. Jobs are ordinary tasks — you can create one against any asset from the asset's Create Job button or the mobile + button, whether or not there's a defect. Raising them from a defect just keeps the fix linked to the problem it solves.
No. Jobs and defects are tracked separately on purpose. When the work is done, set the job to Done, then update the defect's status to Fixed or Closed yourself once you're satisfied it's resolved.