A repeating inspection or job is one schedule that has created a long run of tasks, so deleting a single task from the list does not stop the rest. This guide shows how to remove one task, or the whole series from a chosen date, so you can clear out duplicates without losing the work your team has already done.
Step-by-Step
- Open Inspections or Jobs from the main menu. Repeating tasks show a small loop icon beside the title.
- Find the task you want to remove. The Due date column tells you which occurrence you are looking at.
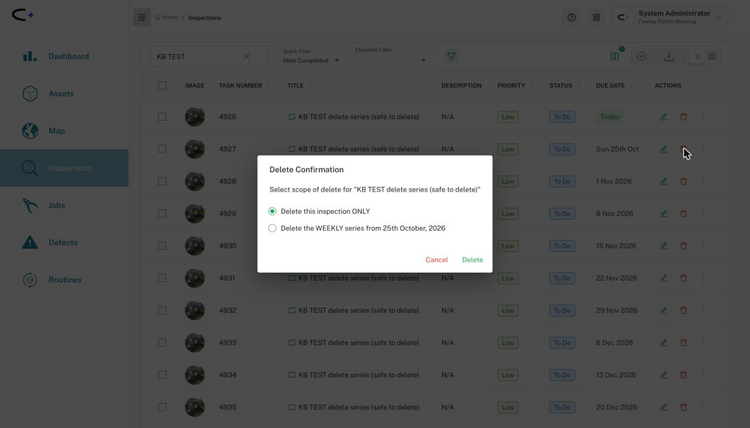
- Click the red bin icon in the Actions column. A Delete Confirmation dialog opens.
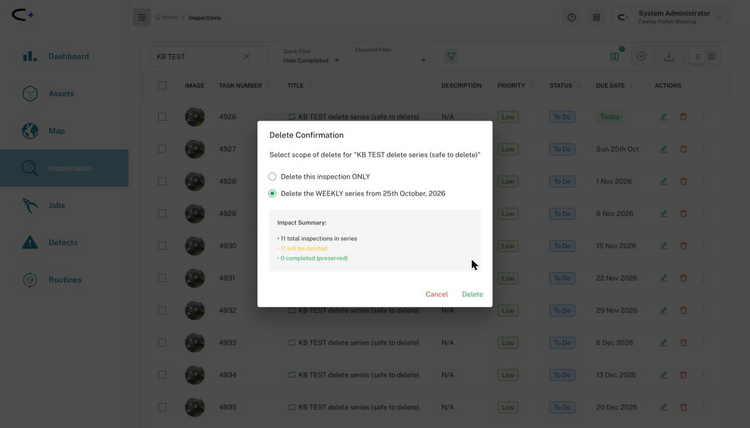
- Choose the scope:
- Delete this inspection ONLY (or this job ONLY) removes just that one task. This is selected by default.
- Delete the WEEKLY series from [date] removes that task and every later one in the series. The frequency and date in the wording match the task you clicked.
- When you choose the series option, an Impact Summary appears. It shows how many tasks are in the series, how many will be deleted, and how many completed ones are preserved. Check it matches what you expect.
- Click Delete. A green Successfully Deleted message confirms it.
Tasks due before the one you clicked are not touched. To end a whole schedule, start from the earliest task still showing in the list.
- Replacing a schedule? Delete the old series first, then create the new one. If you are renaming the asset as well, rename it before you create the new inspection, because the task title is copied from the asset name when each task is created. See Why does the asset name show up as the task title?.
- Same check twice? If an asset has two repeating inspections that cover the same job, keep the one with the checklist attached and delete the other. How to Create an Inspection explains checklists.
- Task belongs to a routine? Remove it from the routine instead. How to Edit a Routine covers deleting a subtask and its future occurrences.
- A check that was due but not carried out is better marked Cancelled than deleted, so your record shows it was skipped rather than leaving a gap. Use delete for tasks created by mistake or replaced by something else.
Common Questions
"This one only" removes the single task you clicked and leaves the rest of the schedule running. The series option removes that task and every later task in the same schedule, so nothing new appears after the date shown.
The Impact Summary lists completed tasks separately as preserved, so they are shown as kept rather than counted in the number to be deleted. Check the summary before you click Delete.
No. Only the task you clicked and the ones after it are removed. Earlier tasks stay in the list.
Yes. The dialog and the Impact Summary are the same, with the wording changing to "job" or "inspection".